![]() This afternoon I’ve been playing around with Yahoo Pipes, a service that converts web pages without RSS feeds into useful XML files oozing with possibility.
This afternoon I’ve been playing around with Yahoo Pipes, a service that converts web pages without RSS feeds into useful XML files oozing with possibility.
For my first project, I wanted to get my local movie listings into Google Reader. Here is the finished product, an RSS feed for The Movie Mill, a theatre that’s only a few blocks from my house.
I’ve been irritated that a service that would benefit the theatre and its customers has not been available for the past few years. (I hope this feed makes it’s way around so that more people will know what movies are playing and when— it builds on the idea that information wants to be free, even if going to the movies costs money).
Other feeds I’ve thrown together today include an RSS feed for the Lethbridge Herald Front Page News and another RSS feed for the Medicine Hat Front Page News too! It’s kind of wonderful that technology allows one to liberate data and reformat it in a way that makes sense.
Details on how I put together the pipes after the jump:
First things first, check out the Yahoo Pipes FAQ to get an overview of what Pipes is, and how it works.
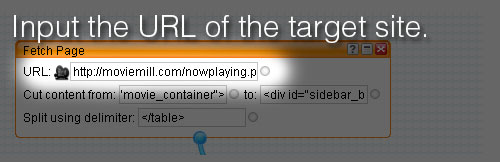
You will have to create a Yahoo account if you don’t already have one. Once you’re logged in, click on Create a new pipe and drag a new “Fetch Page” module into the workspace. It can be found under the sources section. Enter the URL of the target site:
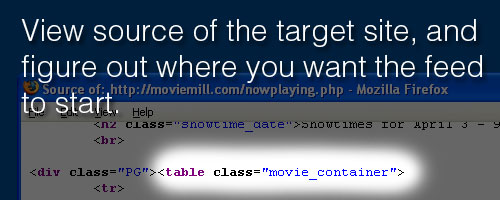
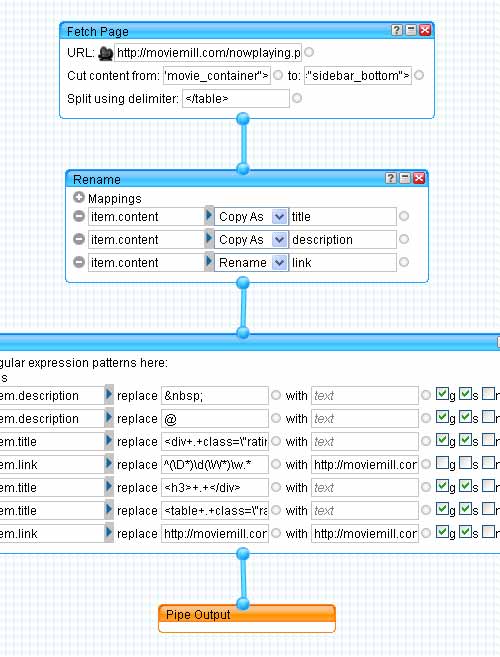
I viewed the source code of the target site and decided where I wanted to begin parsing the document. I didn’t need the sidebar or any of the javascript features for the feed, so I chose <table class="movie_container"> for the start point:
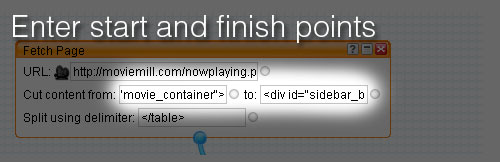
I copied that code and pasted it into the “Cut content from:” input box. Then repeated with the code to show where to end of the file. I copy the HTML tag from just after the main column’s div tag ended. <div id="sidebar_bottom">. All of the content items that I want in the new feed are between those two HTML tags:
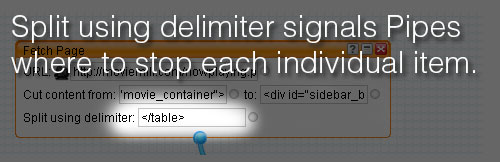
Next I added </table> into the Split using delimiter field, breaking up the page into separate items every time pipes finds </table> within the start and finish locations:
You can test your progress by clicking on the Fetch Page box and making sure that the data is being collected and cut into individual posts at the correct point:
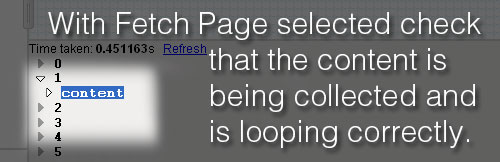
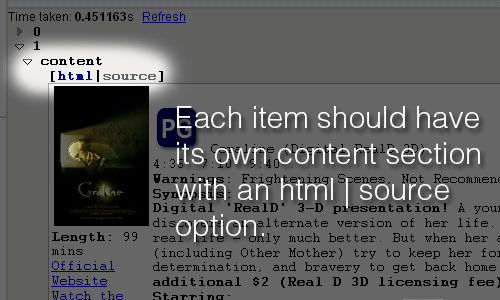
Notice that each numbered item has its own content section that includes options for viewing in rendered HTML or source code mode:
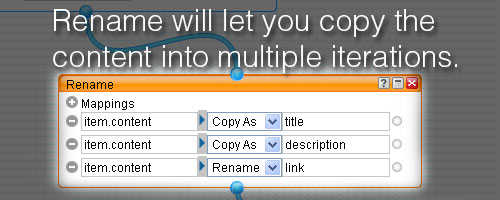
Next add the rename module from the Operators section and connect the data from the Fetch box via a pipe. The rename module lets you rename or copy item attributes. In this example, the page I was pulling data was not formatted semantically, so all the data gets dropped into item.content. I wanted three copies of the item.content data named as item.title, item.description, and item.link. I would eventually edit them down to contain just what they needed for the XML <title>, <link>, and <description> tags but for the moment, three copies was perfect:
At this point, if you click on rename and check the debugger you should find the original item.content, followed by title, description, and link (each containing a copy of the original data).
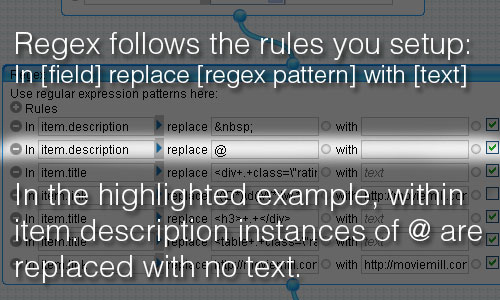
The last step, before connecting to the final output, is the Regex module. You’ll find it in the Operators section. The Regex module lets you apply Perl-like regular expressions to item attributes. (Don’t let that intimidate you, I don’t know anything about Perl, but I found it’s pretty easy to figure out).
I looked to the pipes help on Operators in the regex section for some good help on the basics.
Hold it right there partner. Go back to that last paragraph and click the link about regex. I promise it’ll save you a LOT of trouble.
Most of the regex work involved cleaning out the data that I didn’t want within each of the respective item.description, item.title, and item.link items. Selecting for instances of <div+.+class=\"rating\"> meant that everything between <div and class=\"rating\"> was replaced with no text.
I won’t go through all of the conditions here, but I’ll just say that after a lot of trial and error, I connected the final pipe to the output and the RSS feed so close to launch I could taste it.
Save, run pipe, and then click “Get as RSS”. It’s just that easy.
2 replies on “Custom RSS Via Yahoo! Pipes”
I am stuck. I am trying to do something similar to your example, but I don’t understand the point of your renaming step. I tried the same thing, and the results (two items) show up in the debug panel, but when I go to run my pipe I get nothing. My Pipes page also says it’s returning two items, but I can’t see the content of those items.
Any ideas?
JB, have you tried watching the video tutorials from the site? I’ve found they are very helpful.
Also check to make sure that all of the modules are connected.
As for the point of the renaming step, it’s so that you can run through the data multiple times for different purposes. Ie. one time through to grab the title with link, another to grab the main content.